


から脱退します。
よろしいですか?
Building Sandwich (2-1-1)
I do not recommend learning this pattern as soon as you start. Play around with the game a bit. Figure out how to group 4 of a single color together and how to make your own 2 or 3 chain. Look at stairs or something. If that's not something you want to do, all I can do is wish you luck.
1. Brief look at Sandwich
2. Build 3 columns
3. Add one color to the first 2 columns
4. Add the final color to the middle column to make a 2 chain
5. Making a 3 chain with sandwich
6. Another way to build sandwich
7. Actually Building Sandwich
Bonus Tech
8. Challenge: Build a 6 chain with Sandwich
9. Transition for Sandwich
The Sandwich Color Conflict
Extra
The Power of Orientations
Good stuff to know
1. Brief look at Sandwich
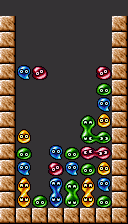
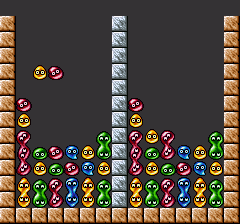
Sandwich is one of the most widely-used patterns in the game due to its variety of uses (and because it has multiple forms). It's also one of the most beginner-friendly forms to use.
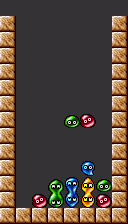
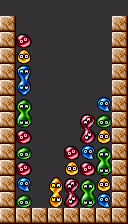
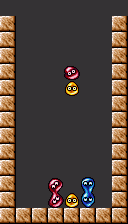
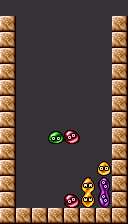
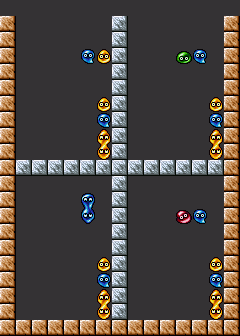
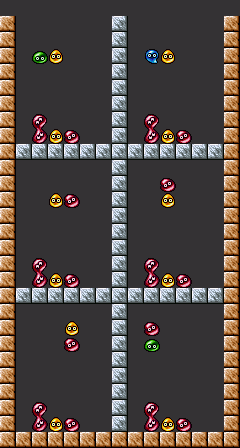
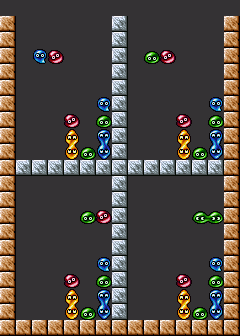
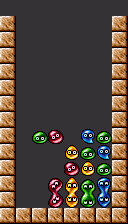
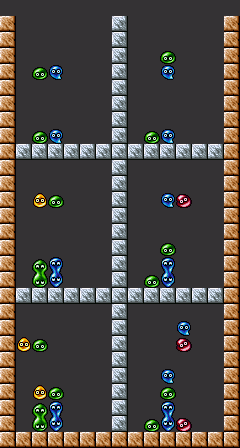
This guide will explain how to use 2-1-1 sandwich as seen below.
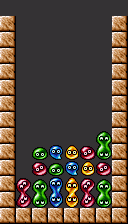
Let's break it down into its parts.
First you have the columns. They're 2 pieces high.
Then we have the color of each column shifted one space to the right. The exception would be the greens on the right. We'll talk about that later. There should be only 1 shifted color on each column.
Finally, we have the 4th and final color shifted back to where the columns of 2 started. Think of it like cutting something with a hand saw. You can't saw something properly without that forward-and-back motion.
It's called 2-1-1 sandwich because the column is 2 pieces high, the shift is 1 piece high, and the top portion is 1 piece high.
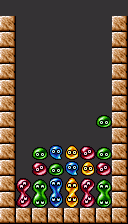
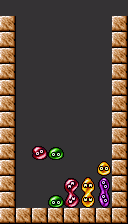
But the greens on the right were missing a color because we couldn't
Sandwich's shape is notoriously difficult to remember. The only way to get it into your head and keep it there is through practice. The purpose of steps 2-6 is to give you a way to build the shape so you can see it on your screen and develop stronger memory for it. After that, the training wheels come off.
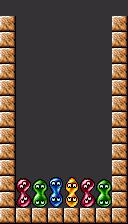
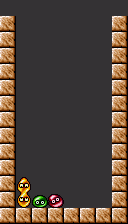
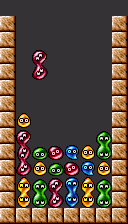
2. Build 3 columns
A very simple way to practice sandwich is to start with just 3 columns. Build them in the middle of the board.
Practice doing just this. Just try to make the 3 columns. Don't try to make the rest of the sandwich. Don't add anything else to the top of the columns. Just build the 3 columns, restart the game, then build 3 columns again. Do this at least 10 times total. Track how many times you did it on a piece of paper, on your phone, or whatever you have. It doesn't matter if there are other pieces in the space on either side of the 3 columns, but again, the 3 columns themselves must have nothing on top.
*Thanks to the game's randomizer (RNG), you won't be able to build the columns every single time properly. For now, we are completely at the mercy of RNG. That means you will have to retry a lot to make the columns properly.
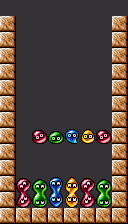
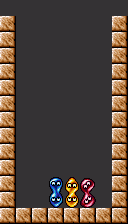
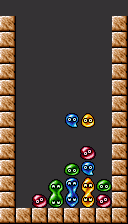
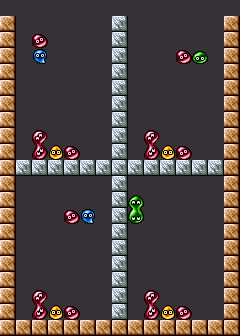
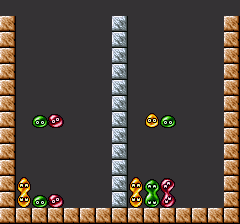
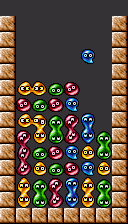
3. Add one color to the first 2 columns
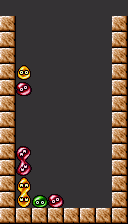
Next, we are going to add the proper color one space to the right of the first 2 columns starting with the middle column (that means blue first, then green). Place the pieces sideways. There's a slight problem that we need to deal with. Each piece you get in this game is two different colors or two of the same color. Most of the time, you won't be able to place the correct color on top of the column without placing the other color next to the sandwich. That means you will see the following a lot:
Just in case the directions for placing pieces sideways was confusing, here is each step:
First, we need to place the middle column's color sideways and to the right:
And then...
We do the same thing for the column on the left. The pieces need to be placed sideways and to the right of the column. That will put us back to the complete image I showed earlier:
Sometimes you will have only one color next to the columns. Other times 2. Sometimes you will have 1 on one side and 2 on the other, etc. It doesn't matter if it looks perfect or not though. All that matters is you have the 3rd color for the first two columns (green and blue in the image above).
Practice this for a bit as well before moving on.
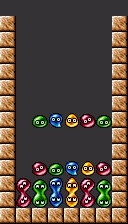
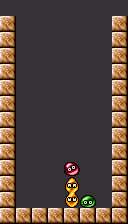
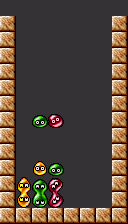
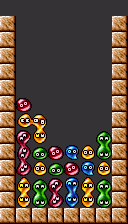
4. Add the final color to the middle column to make a 2 chain
Let's complete the shape now. Assuming you've been practicing the previous parts and you didn't skip to here, you should be fine.
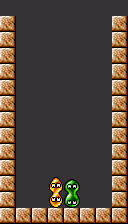
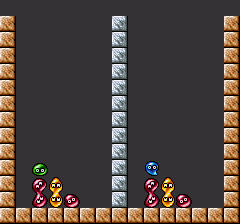
Add the final color to the middle column only (blue). Don't place anything on top of the 1st column (green).
Using the previous image as an example, the above is roughly what the chain should look like.
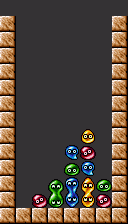
Now we're going to use the chain. Match the colors on the first column (green).
Congratulations! You created a 2-1-1 sandwich and used it. Practice this until you get the hang of it! Our next step will be a 3 chain.
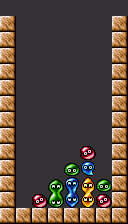
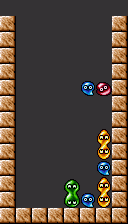
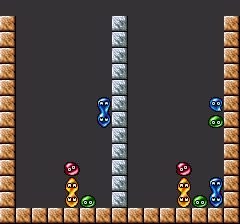
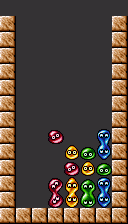
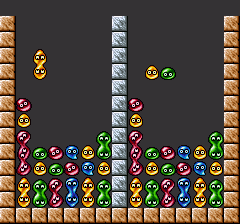
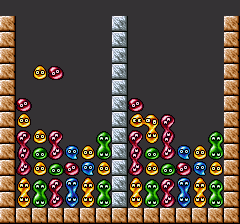
5. Making a 3 chain with sandwich
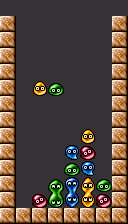
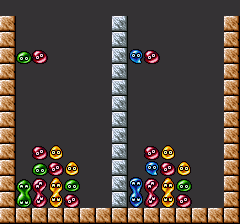
Welcome back! Sorry my chain looks so messy, but that's what happens when we're at the mercy of RNG.
...You did remember that you could throw pieces to the side if you weren't getting what you needed, right?
Just make sure the 2 chain is still perfectly fine. As you can see, I have my 2-1-1 reds in place. In fact, I'll prove it works. Watch!
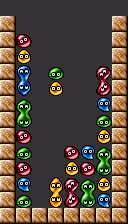
Give me a moment to make another one.
This concept is known as extending a chain. Now that the red is sandwiched between the blues, we need to add reds in order to activate the chain.
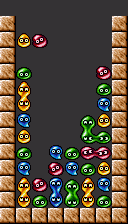
Incredible. A 3 chain.
Practice this until you're confident. Really confident. As in you need to have this memorized.
I mean it.
Really.
6. Another way to build sandwich
You know how I said we were at the mercy of RNG? Let's be less at its mercy (or more since this sandwich building method is more specific).
Hopefully this will open your eyes to the possibilities of sandwich.
***The section below is for learning purposes only. We will practice something else.***
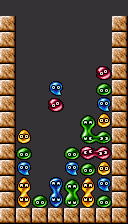
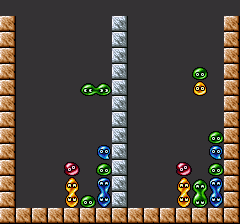
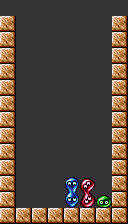
Because you practiced building sandwich so many times, you saw this quite a few times:
There are actually a few ways to make this work, but it's kind of specific.
We need a yellow/red piece...

Or a yellow/yellow piece. Note that there is a yellow inbetween the reds and blues. Because of that, we get the perfect height for sandwich.
***The section above is for learning purposes only. We will practice something else.***
We are going to use these ideas to build sandwich again.
Before a round starts in Puyo Puyo, you can see the first two pieces you're going to get at the top of the screen. In order to practice this, we need to keep restarting the game until you get one of the following:

It doesn't matter what the colors are. It could be two red/blues, two yellow/purples, etc.
The other one is:

Two doubles.
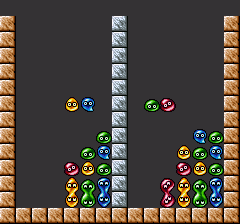
Chances are when you got these two starts, you did this:
What we're going to practice instead is this:
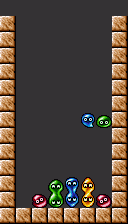
Now you need to practice building 3 chains by starting with this until you're good at it. Start against the wall on the right like in the image.
After that, we work our way to the left. Throw all of the pieces you don't like against the wall on the other side. Double colors are not recommended for this part.
When a yellow (or whatever your color is that isn't against the wall right now) appears, place it in column 5, where the lone yellow is. The other color will go to the left of that.

Now red is the color by itself. When we get a piece that's red and another color, it needs to be placed sideways on top of that red with the other color in its own column by itself.
See the pattern?
Now for the rest of it. Starting from the wall, we move left. Double colors are fine here.
Read in this order (also click on this message to see it in gif form):
1 2
3 4
5 6
So this time, we add the 3rd color for the red first because we already have it for the yellows. Then we add the 4th color for the yellows. Repeat this until you're done.
Speaking of being done, this is where I have to take the training wheels off.
Practice for muscle memory.
7. Actually Building Sandwich
I highly recommend using a simulator for this hefty section. Follow the link below for the one I recommend:
Controls:
Z - left rotate
X - right rotate
Up key - redo last move
S - Start new session. You can also click the blue button.
How to use:


Controls:
Z - left rotate
X - right rotate
Up key - redo last move
S - Start new session. You can also click the blue button.
Moving on...
If you went through my stairs guide, you may remember this one. We need to learn how to use both colors in each piece we get at the same time. So far, we have mostly been using half of each piece.
This is something you will have to learn on your own if you want to be good at it, but if you want something that can guide you a bit as you try to figure it out, that's what this part will be about.
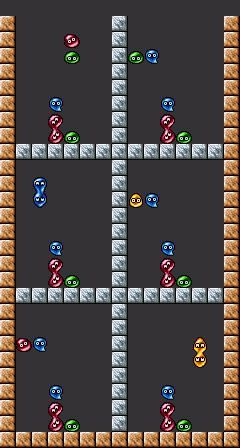
Like in section 6, we're going to start sandwich differently depending on what we start with.


Practice them in order. Focus on one at a time. Practice each one for a long time before moving on to the next one.
Make sure you place the pieces in the exact spots shown. Each one starts in a different spot in order to help you learn.
Click to view a gif:
1. AA BA
2. AB AA Make sure AA is on the left.
3. AA BC
4. AB CA
5. AB CC
Because we went through section 6, we already know how to deal with the other two starts.
I tried to order them from easiest to hardest, but you may have a different opinion based on RNG. Also, the 5th one isn't actually the hardest, but we're not properly equipped to make it easier yet.
Here's how we can build sandwich from each setup:
1. AA BA
Place your pieces in this exact column.
AA BA refers to the colors you get based on order. A is your first color. B second, etc.
Fun Fact: Whenever a game starts, the first two pieces can appear in any order except AB CD. Most starts have inverted versions that are exactly the same. For example, AA AB is functionally the same thing as AA BA.
Here is a chart of possibilities (we'll see more later):
Every combination of the sandwiched color (blue) and another color will work, including a double.
As you build sandwich this way, be sure to add the final color against the wall (in my case, yellow).
After that, we can throw pieces on top of that and still have a properly-built final link.

Now it's possible to work backwards in section 6. Remember. Make a 3 chain or better.
You can complete the link with any combination of your top color and another color, including doubles:
So in total, there are 7 different combinations of pieces that are compatible with this setup. The only thing we need to do is get a pair that has at least one color that's the same as the ones that are already against the wall. Once we finish the link on top, we have the ability to stall for the pieces we want. This is very easy to work with, but only with a lot of practice.
2. AB AA
Possibility chart:
1 2
3 4 7 8
5 6 9 10
3 4 7 8
5 6 9 10
1 and 2: This is what we need to practice for this part. You can skip ahead to the next image if you'd like. The others are stuff you already know or stuff that is very hard to use properly without using the next window (if it works and you didn't look at the next window, you were just lucky). I'll explain them though. Without images.
3, 4, and 5: If we have a pair that is both colors in the setup and we're looking at the next window, we can make a choice depending on what appears after that. 3 is a good choice if the next piece doesn't have a yellow or red in it. 4 is better if the next piece has a red in it, and 5 is better if the next piece has a yellow in it. This is only if there is nothing next to the side of the columns. It is much more specific if something is already there.
6 and 7: This is what we just practiced against the wall in the previous setup, but now it's away from the wall. We can still stall by placing pieces on top of this column after placing a piece like that, but that is unsafe and building this way would create a terrible habit. In other words, avoid stalling in column 2. We will have the entire right side of the board to stall with anyway.
8 and 9: Standard extension for sandwich that you've probably done many times already.
10: Normally I would recommend you to put a double color against the wall, but my guide for this section requires that you don't do that. Still, it's good to know that it can be done. We'll work with this idea later.
So back to 1 and 2.
Our objective is to make one of these two peice placements, then build a 3 chain with sandwich. In order to use it, we must use the color in column 2. In other words, the chain should look roughly ike this:
If there are two reds on the right instead of the green and red in the image above, it's even better.
How do we make a sandwich chain starting with this? See below.
Oh hey! This looks kind of familiar. Almost as if we did this in section 3, which we definitely practiced! The difference is that important part I mentioned earlier. We need a perfect piece in order to do the 4th step (with the green and red or in other words, the two colors in column 2). This and the start of the setup are examples of both colors in your pair being useful at the same time. If you don't get the colors you want, you can throw them to the right. There is a lot of space to throw away pieces, so you should get what you need as long as you know what you're looking for in the first place.
Also, if you get your perfect piece early, it can be used immediately.
Good luck with your practice and be sure to remember this concept.
3. AA BC
Place your pieces in these exact columns.
The most important parts here are learning how to use the start itself and another perfect piece situation. The goal is to use these three colors to make a 3 chain.
Your chart:
1 2
3 4
5 6
3 4
5 6
1. We are learning this one. Perfect pieces are your friend.
2, 3, 4, and 5: You've actually done most or all of these before when you practiced the first setup.
6. It's actually hard to say which column is best for a double in this situation, but considering what we're going to do, this is probably a good one. Don't use double green (because a green is already there). Throw it to the side.
There are more options, but we won't use them, so I won't list them this time.
I'll leave what you do to the left side up to you. As long as you make a proper sandwich link with what you have in column 2 (blue in the image below), you're fine. You can do it before or after you get your perfect piece. Doesn't matter.
As for the right:
The red/green is the required piece. You must use a perfect piece vertically like you see with the red/green. The rest is an example of completing the chain. I'll leave how you do that up to you, as you should have some ideas by now. This is one of the most useful things to know about building sandwich in my opinion.
4. AB AC
Place your pieces in these exact columns.
It's visually the same as the last one, but our building method and the position of the pieces are different. What we're going to practice this time is turning this into a 4 chain. We are going to use the three colors from the start of your setup and...
Welcome back an old friend. Remember the first setup? Be careful. Green/blue is a perfect piece this time.
Step 1: Place a double color against the wall.
Step 2: Get a perfect piece. The lone color + the wall color.
What has this created exactly? Something more powerful than you ever could have guessed.
Behold the chart, post-setup:
Step 1: Place a double color against the wall.
Step 2: Get a perfect piece. The lone color + the wall color.
What has this created exactly? Something more powerful than you ever could have guessed.
Behold the chart, post-setup:
1 2
3 4 7 8
5 6 9 10
3 4 7 8
5 6 9 10
1: Perfect piece.
2: Perfect piece that also completes the link against the wall. That means you can stall up there now.
3, 4, and 5: Completes the link against the wall as well.
6: Perfect piece.
7 and 8: Standard way to extend sandwich. Practiced before.
9 and 10: BONUS TECH!!! I will cover this optional method later.
 Remember, you're making a 4 chain.
I think it's reasonable for me to think you can figure the rest out. Nothing else is new. Throw pieces to the wall against the left to stall. If you completed the link at the top of column 6 (the wall on the right), you can stall up there too.
2: Perfect piece that also completes the link against the wall. That means you can stall up there now.
3, 4, and 5: Completes the link against the wall as well.
6: Perfect piece.
7 and 8: Standard way to extend sandwich. Practiced before.
9 and 10: BONUS TECH!!! I will cover this optional method later.
I think it's reasonable for me to think you can figure the rest out. Nothing else is new. Throw pieces to the wall against the left to stall. If you completed the link at the top of column 6 (the wall on the right), you can stall up there too.
Bonus Tech (Optional)
If you haven't practiced the stuff above, go back and do that before you try this one. Also, because this is optional, I will keep the explanation brief.
It's like magic. If you have only 3 colors on the last link, you can add the last one to columns 5 or 6! This only works if you complete the sandwich in column 5 (greens) first.
5. AB CC
Place your pieces in these exact columns.
Phew. The previous part was so much work, but now we're out of it as a much much better sandwich builder! Let's end this with two more perfect piece scenarios. You should be familiar with one of them already, so only one is new. Doesn't sound that bad, right?
Step 2: Perfect piece sideways. Based on columns 1 and 2 (yellow and green).
I want you to make a 3 chain through this method. You must do steps 1 and 2. Complete the 3 chain after that.
Also, it's possible to do that again:
Much simpler than the last one, huh? This doesn't excuse you from practicing a lot for muscle memory.
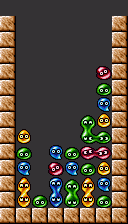
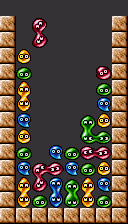
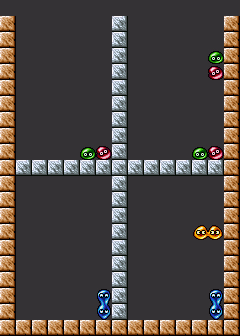
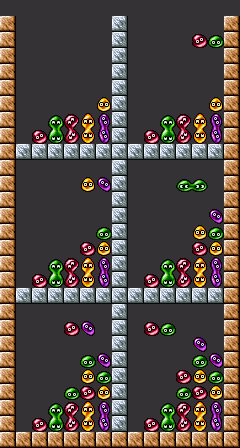
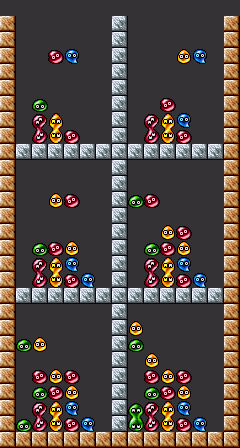
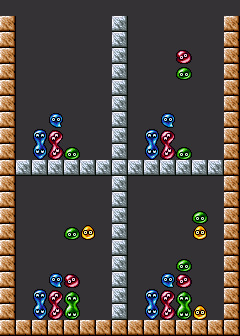
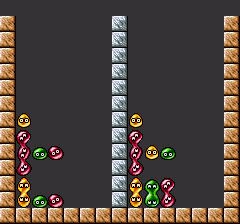
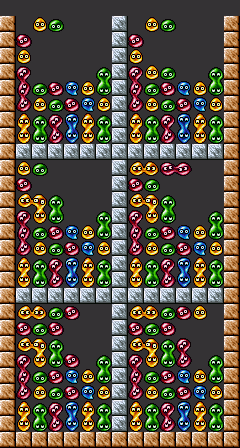
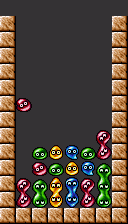
8. Challenge: Build a 6 chain.
Did you practice all of the types? If so, nice job. Here's a challenge for you. Build a 6 chain.
Remember this? When a proper sandwich chain is made from left to right, we get a 6 chain. If you're lucky, you might get a larger one because of the stuff you threw on the right side. That doesn't count. You need to make genuine 6 chains with sandwich.
This will prove that you have indeed been looking for creative ways to complete links, that you actually finished the final link where the greens are before throwing pieces on top to stall, and that you're ready to move on to the next section.
Rules:
Do not use a simulator.
If you are playing on a game that lets you redo your moves, do not redo your moves.
It must be a proper sandwich chain. You must have 6 sandwich links on the bottom of the board like in the image.
Having extra pieces above each sandwich is fine. If you get a 7, 8, etc. chain due to luck, it's fine as long as you had all 6 sandwich links on the bottom.
Be sure to practice until you're comfortable making 6 chains.
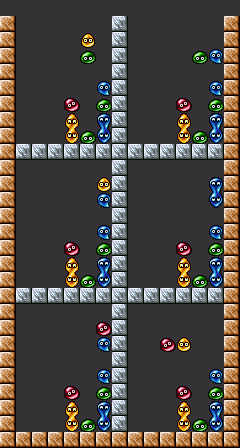
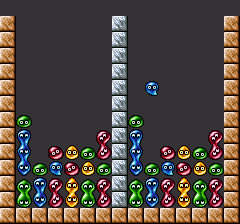
9. Transition for Sandwich
Great job getting through sections 7 and 8. Now you're ready for bigger and better things. Ever wanted to make something larger than a 6 chain? The best way to do that is to learn a transition.
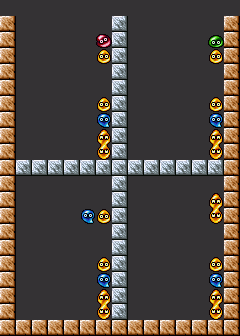
We'll build it using this start: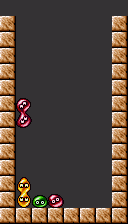
What a great way to use a double red in this situation.
Up we go (notice that the color on top matches the color on the very bottom). Hmmm. Why don't we place some perfect pieces just to show you what we're doing here...
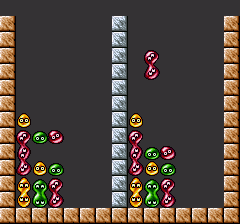
For a nice 3 chain. Let's see what it looks like when the rest of the chain is filled in.
This is a 7 chain. That's one more than 6. Amazing, right? If you want to learn how to do this, you need to practice it.
Fun Facts: The bottom part of the board that's all sandwich is called the first floor. The stuff that's placed above that is on the second floor. The sandwich transition's purpose is to reach above the first floor in order for us to extend the chain further using the second floor. The direction the chain must move in also changes.
We have been building chains that move from left to right. On the second floor, we need to build the chain so it moves from right to left.
As you can see by this big chain, the sandwich links on the second floor are facing the opposite direction and the chain is moving from right to left.
Despite it being the same form, building sandwich in a way that makes it flow in the opposite direction will feel different than building the way you have been. I suggest practicing backwards sandwich on the first floor if you want to become good at doing that on the second.
Additionally...
The yellows on the second floor aren't shaped like the sandwich we've been practicing! If we want to build sandwich on the second floor, this needs to be built.
Any combination of yellow and another color works besides yellow/red. Another thing to watch out for on the second floor is the fact that there is a first floor.

If we used any other combination of yellow and another color, we would have a proper chain.
Finally, we need to be aware that transitions can cause color conflicts.
The Sandwich Color Conflict
Transition to column 2 (TR2?)
The transition can't be the same color as column 2. This is pretty easy to avoid, so as long as you're aware of it, you'll be fine.
Extra:
This is a section where I talk about random, useful stuff I find that couldn't fit into the guide itself.
The Power of Orientations
Check it out:
Click for Gif
You need to know how to use the next window in the middle of a game for this one.
Top Left: If you need to use more greens than blues.
Top Right: If you need to use more blues than greens.
The middle and bottom portions are a visual example of using more of the preferred color.
Good stuff to know (still needs testing)
I had trouble dealing with this situation, but it's actually fine.
This option provides you with the most options. Green/red would be the worst usable option in this situation...assuming you want to make a perfect 2-1-1 sandwich.
If you know how to make tails, you could also consider this:

更新日時:2020/05/08 13:41
(作成日時:2020/04/21 12:21)
(作成日時:2020/04/21 12:21)
コメント( 0 )
コメントするにはログインが必要です